Note that the Abandoned Cart feature requires the Connect My Sales Pro Plan or higher.
Setting up the Abandoned Cart feature requires following a few steps. We’ll walk you through each step below:
1) First, you’ll need to ensure you have the necessary custom field created in your Keap account:
Abandoned Cart Data — this field requires a custom field with the type “Text Area”
To simplify the setup, it is suggested you use “Connect My Sales Abandoned Cart” as the custom field name. This will ensure the email examples included below will work without any required customizations. If you choose to use a different custom field name, you’ll need to modify the email examples to properly reference the custom field names you used.
2) Next, you’ll need to create a tag in Keap that will be applied each time a new abandoned cart is created in Shopify. To simplify the setup in the next step, ensure the name of the tag contains “Abandon”. Examples of possible tag names to use include:
- Abandoned Cart From Shopify
- Connect My Sales Abandoned Cart
- Abandoned Cart Start
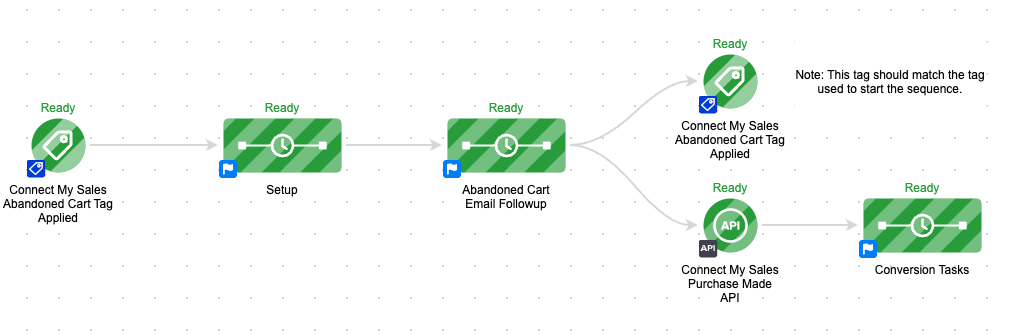
3) Create a campaign and start that campaign using a “Tag applied” goal with using the tag established in step #2, above.
4) Following the Tag applied goal, you’ll want to add a sequence that contains the Add/Remove Tag action to remove the abandoned cart tag established in step #2, above. This will allow this contact to have the tag applied again in the future, which will kick off the abandoned cart campaign again. In the sample campaign below, this occurs in the sequence labeled “Setup”.
5) Create your abandoned cart followup sequence using emails and delay timers based on your specific needs. See the section “Abandoned Cart Email Followup Content” below for details on how to customize your emails with abandoned cart recovery links and/or a list of the product’s in the customer’s abandoned cart.
6) Add an API exit goal that ends the abandoned cart followup when a purchase is made. Learn how to set up this goal here.
7) Once your campaign is complete and published, you’ll need to enable the abandoned cart feature within the Connect My Sales dashboard in your Shopify admin panel. Once enabled, you’ll then select the Abandoned Cart Data custom field you created in step #1, above, as well as the Abandoned Cart tag you created in step #2, above. Be sure to save your changes once finished.
Your campaign will look something like this:
Abandoned Cart Email Followup Content
Below you’ll find the content for two sample emails. You can use this content as-is, or modify it as you wish based on your specific needs.
Continue Checkout Link emails
In this example, we include a “continue checkout” link in the email to allow the customer to return to Shopify and access the cart they abandoned. This link will work regardless of whether the customer is still using the same device or browser as they were using when they were previously shopping on your store.
First, you’ll need to add this code to the top of your email, within a “Text” block:
[%- assign ps = contact.custom_fields.ConnectMySalesAbandonedCart | split: '||||||' -%] [%- assign cartUrl = ps[0] -%]
Note that this code references a Keap custom field called “Connect My Sales Abandoned Cart”. If your custom field is named something different, you may need to modify the code above to match the name of your custom field.
Next, you can add the following within a “Text” block of your email to display a link back to the abandoned Shopify cart:
<a href='[[ cartUrl ]]'>Continue Checkout</a>
This email might look something like this:

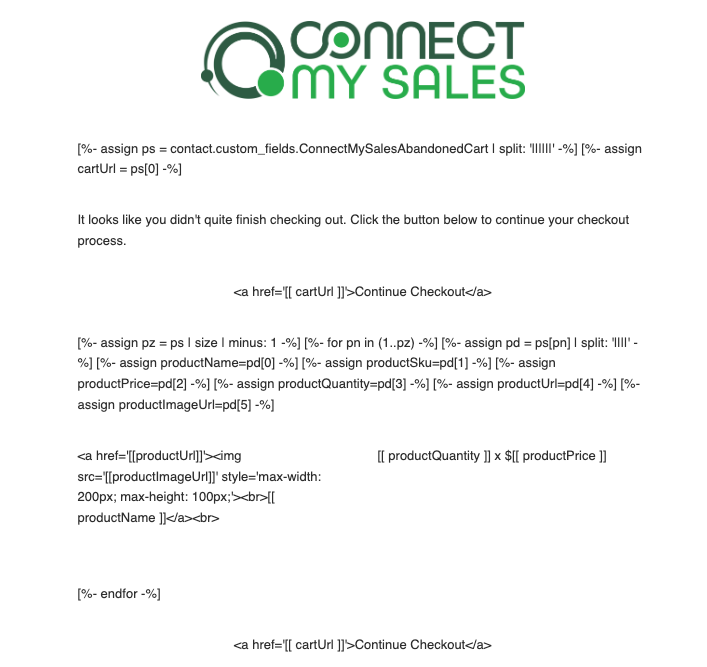
Abandoned Cart with Product List
In this example, we’ll include the “continue checkout” link as in the previous example, but will also display a list of products in the customer’s abandoned cart. This can be useful to remind the customer of what they were shopping for when they abandoned their cart.
First, you’ll need to add this code to the top of your email, within a “Text” block:
[%- assign ps = contact.custom_fields.ConnectMySalesAbandonedCart | split: '||||||' -%] [%- assign cartUrl = ps[0] -%]
Note that this code references a Keap custom field called “Connect My Sales Abandoned Cart”. If your custom field is named something different, you may need to modify the code above to match the name of your custom field.
Next, you can add the following within a “Text” block of your email to display a link back to the abandoned Shopify cart:
<a href='[[ cartUrl ]]'>Continue Checkout</a>
To display the cart, you’ll add the following code within one or more “Text” blocks:
					[%- assign pz = ps | size | minus: 1 -%] [%- for pn in (1..pz) -%] [%- assign pd = ps[pn] | split: '||||' -%] [%- assign productName=pd[0] -%] [%- assign productSku=pd[1] -%] [%- assign productPrice=pd[2] -%] [%- assign productQuantity=pd[3] -%] [%- assign productUrl=pd[4] -%] [%- assign productImageUrl=pd[5] -%]

<a href='[[productUrl]]'><img src='[[productImageUrl]]' style='max-width: 200px; max-height: 100px;'><br>[[ productName ]]</a><br>

[[ productQuantity ]] x $[[ productPrice ]]

[%- endfor -%]
You may format the output of the code to match the style of your email. You may also remove elements from the above code to limit what is displayed (e.g. you can choose not to display the product quantity in the cart, if you wish).
This email might look something like this. Note in this example, the “Continue Checkout” link is repeated at the bottom of the email: